Gluing or screwing
Wooden skirting boards can be attached in two ways: glued with a mounting kit (MS polymer) or fixed with plug and screws.
Depending on the chosen method, the following materials and tools will come in handy:
Materials
- Skirting boards
- Primer
- Lacquer paint
- Flathead screws
- Plugs
- MS polymer adhesive
- Acrylic kit
Tools
- Screw drill
- Miter saw
- Pencil
- Tape measure
- Caulking gun
- Putty knife
- Paintbrush
- Hammer
- Sandpaper
Installing skirting boards in 6 steps
- Preparation
Finished painted skirting boards save you the job of painting, but you can buy untreated skirting board material to match the colour to your interior. It is best to paint before installing the skirting boards. For a nice result, apply primer before painting. Allow it to dry and sand lightly before painting. To avoid warping, paint the back as well.
- Cut the skirting boards to size
Now, you may cut the skirting boards to size. You can fix each skirting board immediately, or saw all the skirting boards first. Then, mark them with a number on the back to know where they will be placed on the wall.
Tip: Buy about 10% more skirting board material than you think you will need after measuring the room. You always have some loss with sawing.
- Attach the skirting boards
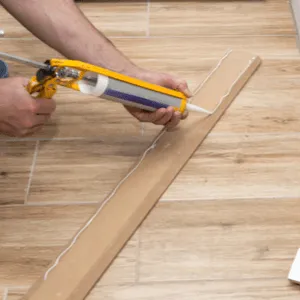
• With glue
Apply the glue to the skirting boards using a caulking gun. Do this in dots or waves with about 10 cm interspace. The recommended method for securing the skirting boards is as follows: stick the skirting board on the wall and immediately pull it off again. Leave the board for 5 minutes to allow the glue to dry then push it firmly into place, or tap it with a hammer. Use a piece of waste wood to avoid damaging the skirting board.
Tip: With a slightly uneven wall, you can apply a thick dot of glue on the wall where needed. You’ll work away the gap when you finish the top of the skirting board with an acrylic kit.
• With screws
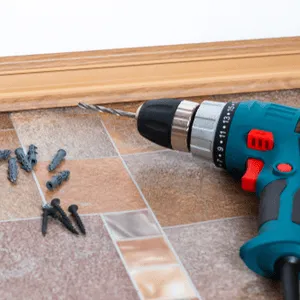
Drill a hole in the skirting board every 30 cm using a 3 mm wood drill bit. Then drill out the holes with a countersink bit, so that you can later cover the screw heads with filler and a final coat of paint. Hold the skirting board against the wall and mark the screw holes with a pencil. Drill holes in the wall for the plugs with a 6 mm masonry drill bit and screw on the skirting board.
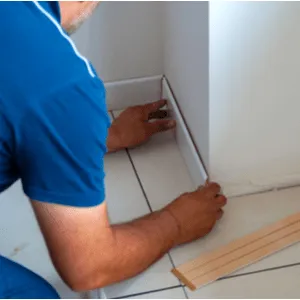
- Create an outside corner
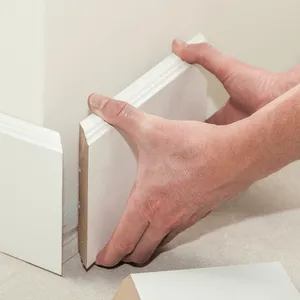
Measure the length of the first skirting board and add the thickness of the board. Cut the board with a 45 ° miter saw. Miter the second skirting board but now, with the miter outwards. The two skirting boards now form a perfectly fitting outer corner.
Tip: First cut the miter before you cut the skirting board on the other side. If the miter does not go well, you’ll have enough length for a second attempt.
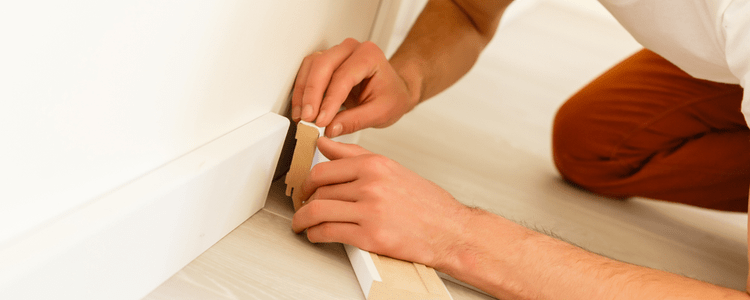
- Create an inside corner
Fix the first skirting board in the corner and slide the second skirting board tight against it. Now hold a piece of skirting board wood against the first skirting board and copy its contours onto the second skirting board. Cut the second skirting board to the marked line.
- Finishing
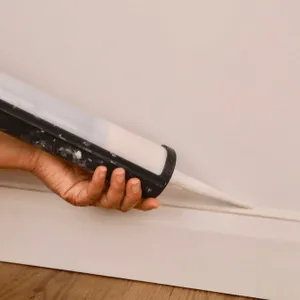
Once you have screwed the skirting boards, cover the screw holes with filler or liquid wood. Fill the gap between the skirting board and the wall with an acrylic kit, which you can smooth out with a wet finger. When the kit has dried, you can hide the filler under a new coat of paint.